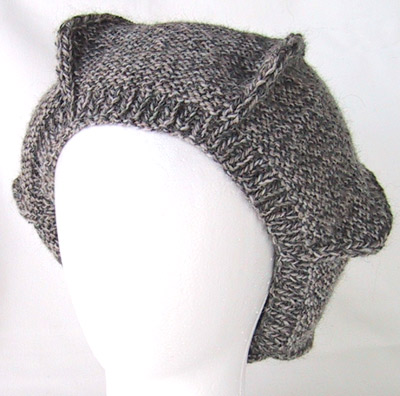
Thursday, March 30, 2006

Grey beret

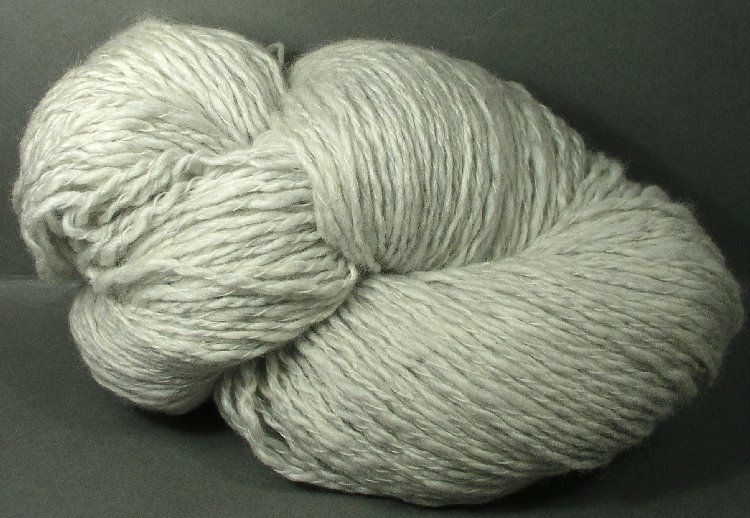
A made this berret in the car on our way to Italy (from Sweden). I wanted it to be stiffer than the ones I made before so I put the yarn double. I made it from some leftovers I had (Lana Gatto). The pattern comes from tata-tatao. I translated it with this translator and modified it slightly. I used 3mm dpn for the ribbing (K2 P2 instead of K1 P1 like in the pattern). The K2P2 ribbing meets the 6 ribs on the beret in a much nicer way. I used 4mm dpn for the beret. I ended the beret with an I-cord (the last 6sts). The ribbing was at first very tight for my head, but since it's a beret I wanted it to be like that. After some wearing it stretched and is now perfect! Here you can see me wearing it in some photos taken in San Gimignano.


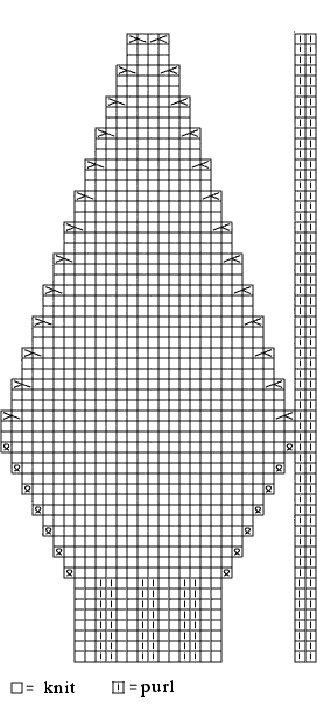
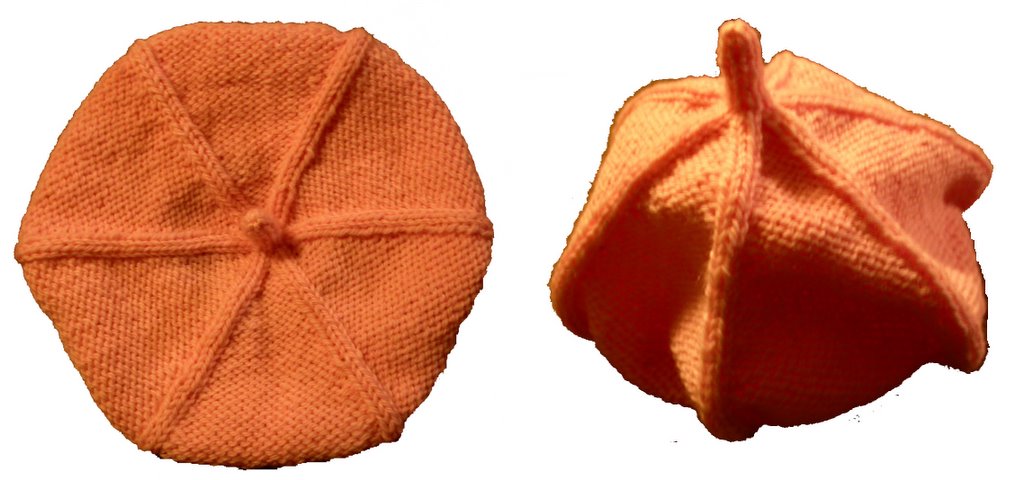
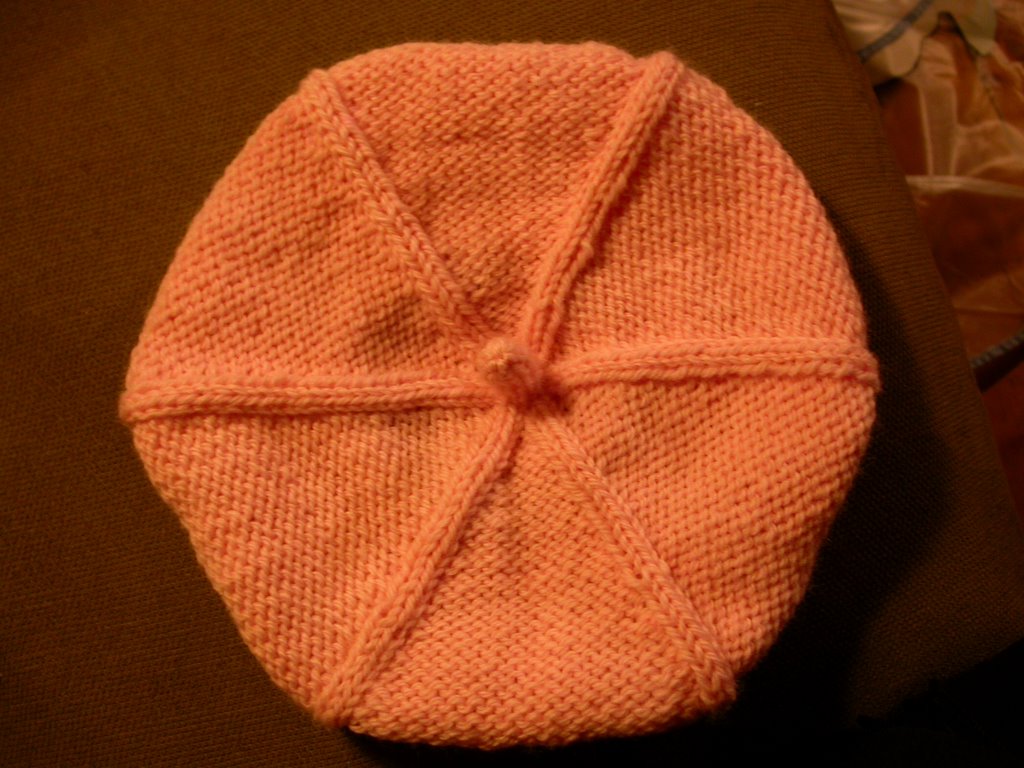
Here is my modified pattern. Cast on 16x6sts. K2P2 for the ribbing. On the "growing" part of the beret increase 1st on each side of the ribs every two rows for 7 times. Then decrease 1st on each side of ribs every three rows for 13 times (you'll have 12sts). Next row (after finishing the graphic chart) decrease 6sts (you'll have 6sts). Work the I-cord for 4cm. Cast off.

Thursday, January 19, 2006

TUTORIAL: Alexandra's Needle case


My old needle case really got me nervous! It was a quilt-one I bought several years ago, but it only had one pouch and kept my needles all mixed up. I didn't know what needle sizes I had and kept bying new needles all the time. I decided to sew a case large enaugh to host them all (and all the future wooden needles I'm going to make very soon!). So I made a case with fuor pouch strips. Larg pouches for my circular needles at the bottom, then for my DPNs, for my 35cm (14"), and for my 40cm (16"). I'm an Italian knitter, or should I say English. I hold the yarn with my left hand, holding my right needle under my right upper arm. For this reason I prefer long needles. Even my DPNs are longer than normal. I find it quite difficult to work with circulars. I'm a very SLOW knitter with circulars.


This case is 52cm (20½" wide) and 45cm (17½") high. It includes 1cm (¼") seem allowence.

It consists of 7 main parts + bindings. Chose a nice selection of fabrics. I had some Japanese fabrics I bought from Mimuclub (it doesn't seem to exist anymore...) and some Italian fabrics I bought at the market in Naples. Cut binding stripes of the width you prefer. You will bind the upper part of each pouch stripe and three edges of the "upper guard".

Outside fabric: 55x48cm (21"x18"). You might want to cut this one larger. Just in case...
Lining fabric: 52x45cm (20½"x17½")
Highest pouch stripe: 52x45cm (20½"x15 ¼")
Next highest pouch stripe: (20½"x12 ¾")
DPNs pouch stripe: 52x21cm (20½"x8 ¼")
Circulars pouch stripe: (20½"x4 ¾")
Upper guard (keeps needles from falling out of roll): 48x15cm (19"x6")
Binding: 3m (3yards 10") + 1,5m (60") for the ties


The hight of the pouch stripes are:

1) 38cm (15")
2) 32cm (12 ½")
3) 20cm (8")
4) 12cm (4½")

The width of the pouches are:
  • 10cm (4") for the circular (you will have 5 pouches on the bottom row)
  • 5x5cm and 10x2,5cm (5x2" and 10x1") for the other strips of pouches
1) Bind the upper edges of the four pouch stripes and three edges of the upper guard (leaving the top without binding).
2) On the back side of the lining draw with a marker the dividing lines as shown (the blu lines show where the pouch stripes end):

3) Pin the lining and the three highest pouch stripes together, alining them up at the bottom edges.
4) Sew on top of the dividing lines from the back side.
5) Pin the last pouch stripe (circular needles) in place, aligning at the bottom edge.
6) Sew on the dividing lines from the back side, but only from the red marks to the first blue line. You will have 10cm (4") wide pouches, large enaugh for your circulars.
7) Make 2 ties of the binding. Mine are 75cm (39") long.
8) Pin the upper guard aligning it to the top edge.
9) Pin the outside fabric to the back side of the lining leaving the seam allowance on the four edges.
10) Double fold the outside fabric to the inside of the case and pin.
11) Fold the ties in two parts and pin to the outside. They will be sewn in place when you sew the seam.
12) Sew the seem.

I find that these three sizes of pouches (2,5cm, 5cm, 10cm) are very versatile and will fit for all kind of needle sizes.

Wednesday, December 28, 2005

TUTORIAL: graphic charts for INTARSIA

I'm into making cushins for the couch. I've worked out these images in photoshop and made a graphic knitting chart. It's supposed to be worked in intarsia. The idea is to have the couch crowded with people in the end...


Guess who it is? I called the first "Beachboy" and the second one "The Woman in Red". Or I might make me a felted bag/tote out of it! Want to see which pics I worked it out from? Here and here it is!


Learn how to chart
Knitpro (translates digital images into knit)
Intarsia

The Knitpro provides a chart with square stitches. In that way you will end up with a squeezed image in the end, since the gauge is never 1 to 1. What you need to do (following the description on Knitty) in Photoshop is:

1) (image/Pixel Aspect Ratio/Custom) Change the Factor. Measure on your test swatch what gauge you have on 10x10cm. For example: 21 stitches on 32 rows has a Factor 32/21=1,523
You will now have a squeezed image.

2) correct the image (image/image size). Uncheck"Constrain proportion". In "Pixel Dimention" select "percent". Leave the Width at 100% and change the Height to 152,3%. The image will now be square again.

3) follow the description on Knitty.

If you make a closeup you'll see that the pixels aren't square anymore but rectangular. In this way you will have a "What You See Is What You Get Chart". If you want to save it as a jpg you will need to put the pixels back to square and change the width to 152,3% (otherwise photoshop will automatically save it with square pixels end you will have a long-faced image.

Thursday, December 22, 2005

Felted Crassula Scarf

So this is the final result after felting the Crassula Scarf. It shrunk much more than prevented! It's now 18x160cm. So it shrunk more than 50%. I had it wash two times in the washer, but I think I shoud've controlled it during the last cycle 'cause it got too felted. Very thick but still very soft and cozy. I knit up another Rib Beret to go with it too. Right know it's on a plane heading for Rome. It's going to be a Christmas gift from my brother to Anna (he made an order after seing the Rib Beret for Isolde). Putting concrete marbles into the scarf wasn't a good idea. They were shiny before, but turned dull after the washing, leaving a little bit of colour in the cavity... So the next time I'll use only glass marbles.

Monday, December 19, 2005

CRASSULA SCARF

Her it is, the prefelted shibori scarf. I cast on 100 stitches and worked them for 800 rows. I got a 40x270cm long scarf. After tieing in the marbles it got much shorter. I used marbles of different sizes to get i more interesting. I put them so they would be closer at the extremity, and not so many at the neckpart. It took quite a lot of work. The knitting was fast 'cause I knitted it on my knitting machine. But the tying part took really a lot of time. Axel is worried for his marbles taking a tour in the washer. Special marbles I got for him in Barcellona.


Well, here it is around my neck. I'm posing beside my jade plant and it gave me the inspiration of giving this scarf the name Crassula, that is my favourite plant.

There are a lot of patterns of bobbles scarfs that are very nice.

Badonkadonk
Bobbliscous
Boobie Scarf
Bobbles Felted Scarf

Thursday, December 15, 2005

Shibori Felting

I thought of giving Shibori felting a try... I knit a 10 cm square (gauge 24x30) in pure 100% alpaca (Drops alpaca n. 7238).

Then I tied some marbles in it, and it became smaller right away.

After a cycle in the washing machine (40°C) it felted quite well, and it shrunk to a 5cm square. I took the marbles out and voilà. It turned out very soft but much more compact (due to the felting). More about felting you can find here. So now I'm ready for a long scarf... I think felted alpaca is perfect for a scarf. You wouldn't like to have something itchy againt your neck, would you?!

Others that have tried...
She Who Knits
Fusionknitting
Shibori felted scarf

Tuesday, November 29, 2005

この帽子について Rib Beret

For Isolde's fourth birthday in September I gave her some pink yarn. We were supposed to dress all in pink for that occasion. Isolde's favourite colour. So I knit her a Rib Beret. I found a very nice one at a japanese site. The pattern is in japanese but it has a grafic chart. Then I translated it with Babel Fish that has a japanese-english translater (mainly to get the gauge and the size of needle and yarn). Well and then I had to convert the japanese needle size to european... I altered the pattern a bit to make it fit Isolde's tiny head. It turned out quite nice and Isolde was so happy. It is softer than the original one andd it didn't assume the same shape. Next time I will use a tweed and knit it tighter.


Saturday, November 19, 2005

Cachmere on eBay


I've just bid on 3 skeins (60g) of cachmere on ebay... First time bidding on ebay but I was too tempted to try this one! Quality cachmere (Filatura di Crosa) 50g sells for $49.95. This item comes from Shrewsbury, United Kingdom, so there will be no taxes added for Sweden. And shipping costs as for the UK. I'm thrilled! I had a cachmere sweater ones, but someone washed it too hot... Actually she washed other 8 sweaters at that occasion... I'm the high bidder on this item right now. 14 more hours to go... Why knit with wool when you can knit with cachmere?
Ok I'll have 180g cachmere, enough for a shawl. Just to give it a try! Then I will go for the heavy stuff! I have my knittingmachine up and ready. Havn't used it in 10years.
The seller is
ColourMart, the home of cashmere on eBay . I wonder if they have alpaca too? Or something like Rowans "kidsilk haze"?

Wednesday, November 02, 2005

Clapotis


I started my Clapotis some days ago. It's the first time I follow a pattern made by someone else. But I really like the simplicity of this shawl. It wasn't that easy to figure out what all the abbreviations stand for. I like grafic charts much better. The yarn used is Mega Idena (produced in Italy for Almedahls). It's a nice effectful, shiny, 100% polyamid yarn that can be worked with neadles 4,5-10mm (7-15 US). The original pattern called for a silk/wool blend but my choice of yarn is 'cause I wanted a fancier evening wrap. It's a free pattern offered by Knitty that has among the nicest patterns online! I like the effect on the wrong side the best.
On craftster there's a knitalong going on just on this project. I've just secretly joined! Well I might post there when I'm done.